Wednesday, July 11, 2012

Dorm Room Crafts! (Part 3)

I consider this piece to have been the real challenge in the set of three that I've done so far, but it's also the one I'm most proud of!


And the other side?


Project 3: Jewelry Shadow Box (SECRET Shadow Box!)


My Pin-spiration? (the pin leads here for reasons I don't know)


I deemed it necessary to have a cool, easy way to display and store my jewelry, and this seemed perfect. I didn't have a box, so I went a different route: I bought a deep 10 x 14 canvas at Binders, which happened to be having a sale on canvases! 

Using my trusty Martha Stewart acrylic paint referenced in the first post, I painted the outside of the frame, and I painted the canvas (really the back side of the canvas since I was working on the back side of the entire thing) white. I had gotten a tube of acrylic paint in Zinc White from Binders as well for about $4.50.


I then spent a long time trying to carefully plan the chevron pattern that I was attempting to do in tape so I could paint over the white with blue, but finally threw my hands up in the air and put down tape approximately where it looked right. What's crafting without a little risk?  ;)

So I put down masking tape where I wanted my white chevron to be, and then painted over the canvas in my blue paint. When I lifted the tape off after two or three layers of blue paint, it left the white showing through. From various pencil marks and fingerprints, the white part wasn't quite right, so I added a couple more layers of white paint to the chevron.


Then I let it dry overnight! 

Now to actually turn it into a storage unit. I got twelve brass cup hooks at Ace Hardware (two packs of six at $2 a pack). They look like this and are about 3/4 in. long:


The next part was fun. I dented a small hole where I wanted each hook and then screwed them in. I put them in on the underside of the frame that holds the canvas, as well as on the sides. I did six on top, and then three on one side (for rings) and two on the other (for bracelets). 


I was going to add little boxes on the bottom like the pinterest one had done, but I decided to let the frame be able to sit flat against the wall even if the other side were turned around. So I made a SECRET jewelry shadow box to hide my jewelry from the dorm hall kleptomaniac!

Since I did, after all, have a nice clean canvas on the other side, I went ahead and painted it so that I could turn my jewelry holder around and have a nice (deceiving!) piece of art. It came out like this:


If only I could draw a stag freehand. Good thing there's pinterest! I saved this image from pinterest (originally found here):


I copied it into a Word document and sized it to be a little less than a page tall, then printed it. Then came several minutes of very concentrated cutting!

I made little masking tape rings (to be like double-sided tape) to tape down as much of my stag stencil as I could to the front of my canvas. Pressing the edges down as I went, I painted with the same blue paint over my stencil with a couple coats. Then came the going back in and painting white paint carefully into the body (the antlers proved challenging!). 

After the stag was dry, I painted over it with a light coat of glue and added a very light coat of white glitter (I can't really tell if you can see it in the picture). It's subtle but adds nice dimension.

I haven't added hardware to actually hang up my secret jewelry holder/painting yet, but I'll need to put the picture wire at the top (as opposed to on the back or front) so I can seamlessly turn my canvas around as I wish.

Ta-da!


Tuesday, July 10, 2012

Dorm Room Crafts! (Part 2)

If you read yesterday's post, you know that I'm on a mission to create cute and functional pieces for my dorm room. Granted, a great amount of the inspiration is coming from Pinterest...


Project 2: Paint Sample Dry-Erase Calendar


I have a small LARGE obsession with paint samples...both how many colors there are and the fact that they are very much free (though I do admit to feeling guilty taking like seven samples with the complete knowledge that I am not buying actual paint anytime soon).


My version is above; this one I found on Pinterest (the pin connects to here, which isn't the original post, but just to give credit where it's due...)


I was already kind of halfway done with the project since I've been working on this board since last summer. I saw the great idea to just use a basic frame with glass inside as a dry erase board, and so I got a basic 12 x 12 frame so that I could put in any scrapbook paper (with material on it or not) and use it as a dry erase board. So when I saw the paint chip calendar idea, I basically just needed to make a new template for my frame using the paint samples. 

I don't have pictures of the work in progress, but you could really put in the paint chips into any size frame; you just need to make sure to cut each sample strip correctly to fit your desired dimensions. I cut each strip so that the width measured 1.5 inches long so that seven of them could fit on 12 inches. I could have used double-sided tape to put them down on a basic piece of white scrapbook paper, but I happened to use the basic Elmer's School Glue. 

All done! And of course, you can just erase your calendar and write down the next month. Or you could make an entire other template with a different set of paint samples! 


Monday, July 9, 2012

Dorm Room Crafts! (Part 1)

I've been excited for a while (let's face it, a couple years) to decorate a dorm room. New color scheme, the challenge of working with a small space...

But I didn't want to just decorate. I wanted to make as much for my dorm as I could. So what did I make? Three projects so far, and with minimal supplies. The next few coming soon...

Project 1: Bulletin Board


My roommate and I have decided on a color scheme of blues and greens, and I've already done a bunch of crafts with just one paint: Martha Stewart Crafts Multi-Surface Satin Acrylic Craft Paint. This stuff has been great so far, and a little goes a long way. 

Anyway, for the bulletin board, I guess I could have found some cork board (easily found at craft stores) and a frame, but I saw a bulletin board already made at Marshall's (I can't find a picture of it unfortunately). And I just painted the frame with the Martha Stewart paint! Bonus of acrylic paint: dries really quickly, so perfect for the impatient crafter like me. I've found that a layer dries in about 30 minutes, depending on the surface you're painting. I put three layers of paint on this frame. Two could have been sufficient but I wanted a little extra oomph.  :)


The finishing touch on that one was a bit of a splurge, and I bet there's a way to make them, but I got some fabric-covered push pins from Anthropologie for them ($15 for twenty): 


So, so, so cute. Worth every penny.

The next few projects will appear tomorrow and the next day! 


Tuesday, June 12, 2012

Simply Smashing

I have an interesting mix of traits--I'm both a neat freak and a pack rat. But, being a neat freak, I've learned organized and fun ways to do the collecting and keeping of keepsakes that I love.

For example, I keep my "little black book" full of inspiration for style and jewelry, which I talked about on my other blog here. I collage like this:


It's so much fun to collect, paste in, and look through later!

I also like collecting a myriad of other things, though--ticket stubs, quotes, neat pictures, invitations and cards, strange everyday findings, and more. But I haven't really had a place to put them...

How fitting that I stumbled upon this neat idea today at Michael's!


These are Smash Books, and they're a great way to collect various findings or even do a shabby-chic scrapbook! 


These books are so cool--they're spiral bound on the inside and have lots of beautiful pages inside for you to cover any way you want. They even come with things like pockets to collect other things. 


Here's a cool video that shows what you can do with Smash better than I can.

As you can see, the books come with a Smash pen, which has a nice black been on one side and a glue stick on the other, so whenever you need to paste in your latest finding, you have glue with you! There are even other fun add-ons you can buy if you want, like these removable labels.
How fun is that? I'm excited to paste in recipes, lists, paint chips, and more. Perfect for the constant collector!


Sunday, January 1, 2012

Tea, Tea, and more Tea

I'm told that from a very early age, I adored tea. I never grew out of my penchant for having tea parties, and multiple birthday parties became tea parties, and tea-related gifts came to be my favorites to receive. To this day I'm still a tea lover, and as the weather has started to become cooler, I'm gearing up for another lovely tea-filled winter!


Many people say they don't "get" tea, and the appeal is kind of hard to explain. My love of it is multi-dimensional. I first and foremost love the tastes of different teas: the intricacies of different types and flavors. Tea is also my favorite means of relaxation, whether I need a cup as I'm working or as I soak in the bathtub. I also like the precision of tea making. To make tea well, the amount of tea, temperature of the water, steep time, and more need to be monitored carefully, and I like the different details and ritual that goes along with making it. Tea is also beautiful in and of itself, and I love watching leaves unfold as they steep, and the color of the infusion after it has steeped. The beauty also comes in the form of beautiful teapots and containers that hold tea! 


I'm sure that I'll add more posts about tea later, but today I want to show some of my favorite teas and accessories. I wouldn't be able to call myself a real tea lover if I didn't use loose, whole leaf tea instead of tea bags (come to think of it, I don't remember the last time I used ground up, bagged tea!). Once I discovered loose tea, I never looked back: the flavors are so much deeper and complex in loose tea, as opposed to the ground tea that now tastes like metal to me. 


Let me first post a chart from Teavana that has proven helpful in my tea making adventures. It lists the type of tea, along with the amount of leaves to use in 8 ounces of water. The last two columns show the temperature that the water should be, and then the steeping time. Many people just thrown a tea bag into hot water and leave it there as they drink it, but it really should be removed after the time listed to avoid a bitter taste. 


By the way, I love Teavana. Where I live, at least, this is the best place to find high-quality tea. I'd love to hear about tea stores you love too! Teavana can be expensive, but good teas are bound to be expensive since the best parts of the tea plant are used.


As I said above, one of the things I enjoy about tea is storing it. Tea needs to be kept in an airtight container, preferably a tin one, away from heat and light. Teavana has some beautiful tins--I have the one pictured second from the right, which I keep some green tea in, and it's fun to look at and take out in my tea-making process.


I adore my elephant teapot which I found at World Market (one of my favorite stores--need to write about that too!). It's a very stylish way to serve tea. You don't have room for a full infuser basket, so you might need a tea ball, but it's still a wonderful pot.

World Market is also a great place to find tea if you're weaning yourself off of the bad ground-up tea for a reasonable price. If you're looking for a great-tasting green tea for a very good price, try this green tea--it's not completely full leaf but it's still much better than the ground-up stuff. It's $6 for 15 tea bags, and you can use the bags more than once if you do it properly. The bags are also biodegradable, and I love tossing them in my compost bin when I finish, knowing it might become this summer's tomatoes!

I'll add more tea wisdom later! 

Friday, December 23, 2011

Personalized Coasters: Easy, Last-Minute Gift!


If you're like me and you prefer DIY gifts over meaningless store-bought items, this easy tutorial is for you. The idea actually came to me (or maybe I remembered it from something else; I'm sure I didn't invent this idea!) when I was trying to think of a gift idea for my father for Christmas. I'll explain more later...


One of my  best friends was recently accepted to Kenyon College in Ohio and is going next year! To congratulate her and help her rev up her school spirit (go Owls!), I wanted to make her a school-spirited coaster.


You can make these coasters with virtually any print-out, and the gist of the DIY is Mod-Podging a printed image onto a basic ceramic tile. I found square tiles (4.25 in x 4.25 in) for $0.82 a piece at Home Depot, so this DIY is wallet-friendly too. Then, the only other supplies you need are:
-Mod Podge (which any crafter probably already has!)
-a basic paintbrush


-access to a computer or printer
-felt and glue gun (optional)


First, select the image of what you will put on your coaster. I just used Google to find an image of the Kenyon logo, and paste into Word to size and print. 

Next, print your image. Plain white paper is fine, but I like to use business stationery, which is a bit thinner and easier to paint on. Check the size of your image to make sure it fits the way you want on your tile. Then, cut it out! 
 Then you can start your first layer of Mod Podge on the entire face of the tile. Make it as smooth as possible, but it doesn't have to be perfect. Just don't use huge amounts, or the paper will become too soggy.
  Now you can press on your cut-out image. Smooth it across the tile to avoid air bubbles collecting underneath it. You'll need to do this periodically, especially as you add on extra layers of Mod Podge. 
 Give extra care to painting the edges of the image neatly onto the tile. As you paint over the image, colors might bleed a bit, so don't move the brush back and forth a lot over the image on the first coat of Mod Podge. This stuff dries rather quickly, so in 10-15 minutes, you can add on another coat and the image won't bleed as much. As it dries those first few times, remember to smooth out air bubbles and lacquer the edges of the imdage. You can do as many coats as you want. I like to do four or so--since we're making a coaster, we want it to hold up to water, and that many coats will do fine.

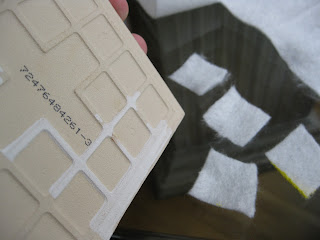
 The bottom of the tiles, at least the ones I bought, are pretty rough in texture. Since the coasters are supposed to be protecting the surface they cover, especially wood, we'll make sure the coaster is smooth on the bottom with some felt. You can buy adhesive felt pads at the hardware store (the kind you put on drawers and things so they don't bang when they close), or you can be thrifty and use some extra felt you might have lying around! I cut out four small squares of white felt and hot-glued them near the corners of the tile. Now it can't scratch the table!

Now you're done! 

There are so many possibilities of images you could put on the tiles. As I said at the beginning, I made a set for my father for Christmas, and I used old maps from places that were meaningful to him, as well as some pages from an old dictionary (I found the page that contained the word "father" and underlined it so it's noticeable) as well as a page from Paradise Lost. Need some more ideas?
-pages from old books
-family pictures
-logos of companies or schools
-a printed out quote
-nature images, like birds and botanicals
-a large letter for the initial of the recipient
-old sheet music
-a set of holiday-themed tiles, like decorative eggs for Easter, different reindeer for Christmas, etc.
-single words in different languages
-geometric designs
-comic strips

Have fun making your coaster!
-Clandestine


Saturday, October 22, 2011

Creative DIY's for the Creative Homemaker!

DIY: Yet More Paint Chip Art
Paint Chip art! Create murals, like the DIYer above. I used paint chips for bookmarks and covered my planner in a gradient pattern of chips and put laminating paper on top!


Cute wrapping ideas! Try wrapping in leftover lace and other fabrics.

Cinnamon Stick candles! Especially perfect for this season. :)