

One of my best friends was recently accepted to Kenyon College in Ohio and is going next year! To congratulate her and help her rev up her school spirit (go Owls!), I wanted to make her a school-spirited coaster.
You can make these coasters with virtually any print-out, and the gist of the DIY is Mod-Podging a printed image onto a basic ceramic tile. I found square tiles (4.25 in x 4.25 in) for $0.82 a piece at Home Depot, so this DIY is wallet-friendly too. Then, the only other supplies you need are:
-Mod Podge (which any crafter probably already has!)
-a basic paintbrush
-access to a computer or printer
-felt and glue gun (optional)
First, select the image of what you will put on your coaster. I just used Google to find an image of the Kenyon logo, and paste into Word to size and print.


 Next, print your image. Plain white paper is fine, but I like to use business stationery, which is a bit thinner and easier to paint on. Check the size of your image to make sure it fits the way you want on your tile. Then, cut it out!
  Then you can start your first layer of Mod Podge on the entire face of the tile. Make it as smooth as possible, but it doesn't have to be perfect. Just don't use huge amounts, or the paper will become too soggy.
 Now you can press on your cut-out image. Smooth it across the tile to avoid air bubbles collecting underneath it. You'll need to do this periodically, especially as you add on extra layers of Mod Podge.
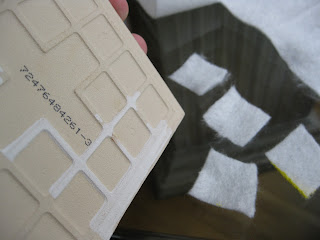 The bottom of the tiles, at least the ones I bought, are pretty rough in texture. Since the coasters are supposed to be protecting the surface they cover, especially wood, we'll make sure the coaster is smooth on the bottom with some felt. You can buy adhesive felt pads at the hardware store (the kind you put on drawers and things so they don't bang when they close), or you can be thrifty and use some extra felt you might have lying around! I cut out four small squares of white felt and hot-glued them near the corners of the tile. Now it can't scratch the table!
Now you're done!
There are so many possibilities of images you could put on the tiles. As I said at the beginning, I made a set for my father for Christmas, and I used old maps from places that were meaningful to him, as well as some pages from an old dictionary (I found the page that contained the word "father" and underlined it so it's noticeable) as well as a page from Paradise Lost. Need some more ideas?
-pages from old books
-family pictures
-logos of companies or schools
-a printed out quote
-nature images, like birds and botanicals
-a large letter for the initial of the recipient
-old sheet music
-a set of holiday-themed tiles, like decorative eggs for Easter, different reindeer for Christmas, etc.
-single words in different languages
-geometric designs
-comic strips
Have fun making your coaster!
-Clandestine